4 Feb 2016

Activate and Deactivate records using Javascript

Hello everyone,
Setting statecode and statuscode attributes using javascript in CRM is not easy as setting other fields unfortunately. But it can be done :)
Normally we expect below javascript code snippets to work but it does not if you try to change the statecode value.
 Xrm.Page.getAttribute("statecode").setValue(1);  


In this blog post I am going to talk about activate deactivate record using javascript in crm. You will learn how to change statecodes and statuscodes using javascript in CRM as well.
In this example I’m going to deactivate a custom entity record with a statuscode 2 which refers to Resolved in my case.
 function SetStateRequest(entityId, entityName, stateCode, statusCode) {  
   var SERVERURL = Xrm.Page.context.getServerUrl();  
   var OrgServicePath = "/XRMServices/2011/Organization.svc/web";  
   var requestMain = ""  
   requestMain += "<s:Envelope xmlns:s=\"http://schemas.xmlsoap.org/soap/envelope/\">";  
   requestMain += " <s:Body>";  
   requestMain += "  <Execute xmlns=\"http://schemas.microsoft.com/xrm/2011/Contracts/Services\" xmlns:i=\"http://www.w3.org/2001/XMLSchema-instance\">";  
   requestMain += "   <request i:type=\"b:SetStateRequest\" xmlns:a=\"http://schemas.microsoft.com/xrm/2011/Contracts\" xmlns:b=\"http://schemas.microsoft.com/crm/2011/Contracts\">";  
   requestMain += "    <a:Parameters xmlns:c=\"http://schemas.datacontract.org/2004/07/System.Collections.Generic\">";  
   requestMain += "     <a:KeyValuePairOfstringanyType>";  
   requestMain += "      <c:key>EntityMoniker</c:key>";  
   requestMain += "      <c:value i:type=\"a:EntityReference\">";  
   requestMain += "       <a:Id>" + entityId + "</a:Id>";  
   requestMain += "       <a:LogicalName>" + entityName + "</a:LogicalName>"; /////////////entity name///////////////////  
   requestMain += "       <a:Name i:nil=\"true\" />";  
   requestMain += "      </c:value>";  
   requestMain += "     </a:KeyValuePairOfstringanyType>";  
   requestMain += "     <a:KeyValuePairOfstringanyType>";  
   requestMain += "      <c:key>State</c:key>";  
   requestMain += "      <c:value i:type=\"a:OptionSetValue\">";  
   requestMain += "       <a:Value>" + stateCode + "</a:Value>";  
   requestMain += "      </c:value>";  
   requestMain += "     </a:KeyValuePairOfstringanyType>";  
   requestMain += "     <a:KeyValuePairOfstringanyType>";  
   requestMain += "      <c:key>Status</c:key>";  
   requestMain += "      <c:value i:type=\"a:OptionSetValue\">";  
   requestMain += "       <a:Value>" + statusCode + "</a:Value>";  
   requestMain += "      </c:value>";  
   requestMain += "     </a:KeyValuePairOfstringanyType>";  
   requestMain += "    </a:Parameters>";  
   requestMain += "    <a:RequestId i:nil=\"true\" />";  
   requestMain += "    <a:RequestName>SetState</a:RequestName>";  
   requestMain += "   </request>";  
   requestMain += "  </Execute>";  
   requestMain += " </s:Body>";  
   requestMain += "</s:Envelope>";  
   var req = new XMLHttpRequest();  
   req.open("POST", SERVERURL + OrgServicePath, false);  
   // Responses will return XML. It isn't possible to return JSON.  
   req.setRequestHeader("Accept", "application/xml, text/xml, */*");  
   req.setRequestHeader("Content-Type", "text/xml; charset=utf-8");  
   req.setRequestHeader("SOAPAction", "http://schemas.microsoft.com/xrm/2011/Contracts/Services/IOrganizationService/Execute");  
   var successCallback = null;  
   var errorCallback = null;  
   req.onreadystatechange = function () { SetStateResponse(req, successCallback, errorCallback); };  
   req.send(requestMain);  
   Xrm.Page.data.refresh();  
 }  
 //*********************************************************************************************  
 //Function: Set State Response  
 //*********************************************************************************************  
 function SetStateResponse(req, successCallback, errorCallback) {  
   if (req.readyState == 4) {  
     if (req.status == 200) {  
       if (successCallback != null)  
       { successCallback(); }  
     }  
     else {  
       errorCallback(_getError(req.responseXML));  
     }  
   }  
 }  
 //*********************************************************************************************  
 //Function: Get Error Xml  
 //*********************************************************************************************  
 function _getError(faultXml) {  
   var errorMessage = "Unknown Error (Unable to parse the fault)";  
   if (typeof faultXml == "object") {  
     try {  
       var bodyNode = faultXml.firstChild.firstChild;  
       //Retrieve the fault node  
       for (var i = 0; i < bodyNode.childNodes.length; i++) {  
         var node = bodyNode.childNodes[i];  
         //NOTE: This comparison does not handle the case where the XML namespace changes  
         if ("s:Fault" == node.nodeName) {  
           for (var j = 0; j < node.childNodes.length; j++) {  
             var faultStringNode = node.childNodes[j];  
             if ("faultstring" == faultStringNode.nodeName) {  
               errorMessage = faultStringNode.text;  
               break;  
             }  
           }  
           break;  
         }  
       }  
     }  
     catch (e) { };  
   }  
   return new Error(errorMessage);  
 }  

You can call above function to deactivate record like this,


 SetStateRequest(_entityId, logicalName, 1, 2);  

I used this function to set a custom entity’s statecode value. You can also set other entities’ statecodes and statuscodes. If so, you may want to refer to this post.

2 Feb 2016

PlugIn - IServiceProvider

When a particular event occurs in Microsoft Dynamics CRM, such as “create of a contact” or “update of an account”, the Execute method is invoked for any plugins registered on the event. This method includes a singleserviceProvider parameter which provides useful service information about the execution of the plugin. In this post, we will take a look at the information that is made available by the serviceProvider parameter.

The types of service objects available include the following:
• IPluginExecutionContext
• IOrganizationServiceFactory
• ITracingService

The IPluginExecutionContext service object is the most useful of the three and provides contextual information to the plugin at run-time. It includes details about the user who triggered the plugin event as well as transactional information handled at the platform layer. The following code can be used to obtain the execution context from the service provider:
IPluginExecutionContext context = (IPluginExecutionContext)serviceProvider.GetService(typeof(IPluginExecutionContext));
The IOrganizationServiceFactory service object allows us to create an instance of the organization service which can be used to define and execute various platform requests. The following code can be used to achieve this:
IOrganizationServiceFactory factory = (IOrganizationServiceFactory)serviceProvider.GetService(typeof(IOrganizationServiceFactory));IOrganizationService sdk = factory.CreateOrganizationService(context.UserId);  
In the example above, we pass in the GUID of the user who triggered the plugin event, which is obtained from the IPluginExecutionContext. Alternatively, we can pass in the GUID of another CRM user, or pass in a null value to execute the plugin logic under the system context.
Lastly, the ITracingService allows us to trace the plugin execution flow and any variables for debugging purposes. For more information, please read my post on Debugging Dynamics CRM 2011 Plugins.
There you have it, an introduction to the various service objects that we will be working with in our journey to create plugins for Microsoft Dynamics CRM. In my next post, we will take a closer look at theIPluginExecutionContext.

29 Jan 2016

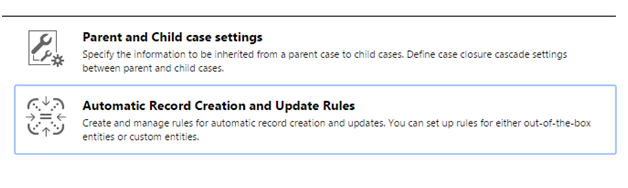
Automatic record creation or update rules in Dynamics CRM 2015 SP1

Microsoft always believes in making life of people simpler using their product. This is what happens with every update of Dynamics CRM.
There was one feature introduced in CRM 2013 to ease the life of CRM users and that feature was Automatic case record creation through email and social monitoring.
This was indeed a very much needed feature. Prior to this update it used to be a manual/automated (through plug-in or workflow) process. As a result this feature came as a boon for a non-developer posse of users.
Albeit it was a boon, it was somewhat restricted in its functionality. We were only allowed to use Email and Social monitoring activities out of all the available activities for case creation and only case creation was possible.
Now, in CRM 2015 SP1, they have enhanced the Automatic Record Creation to another level, the feature is now named as Automatic Record Creation and Update Rules. Name itself is enough for us to understand the advancements.
Lets understand what all things have been implemented in this update.
First and foremost, this rule is now applicable on almost all the available Activities plus Custom activities. Woahh! what a jump.
Below is the list of available activities on which automatic record creation and update rule is applicable:
  • Phone Call
  • Email
  • Appointment
  • Service Activity
  • Task
  • Social Activity
  • Custom Activities
We can select any Activity, Entity, Custom Activity and Custom Entity for creation, previously we were only allowed to Create Case.
Automatic Record Creation or Updation
How to create an Automatic Record Creation or Update rule?
  • Navigate to Settings -> Service Management and then select Automatic Record Creation and Update Rules
    Automatic Record Creation or Updation1
  • Click New, fill in the required details.
  • Click Save.
  • Once, you save the details you can specify the rules for the record creation.
 How to specify rules?
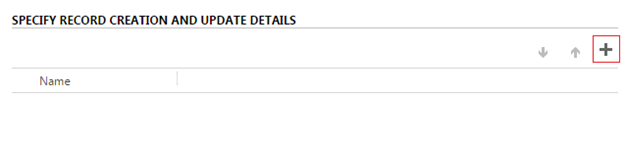
  • Click the "+" button.
    Automatic Record Creation or Updation2
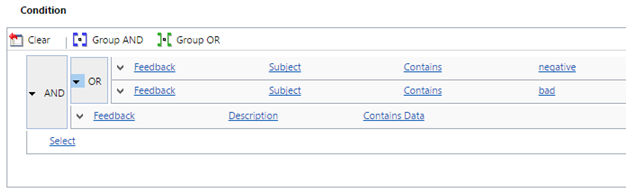
  • Another form would pop-up, here you can specify the conditions and the record to be created.
Specify Conditions:
Automatic Record Creation or Updation3
Specify Entity for which record needs to be Created:
Automatic Record Creation or Updation4
Note: Feedback is a custom activity and Action plan is a custom entity in the above screenshots. 
Once everything is set-up, you need to Activate the Automatic Record Creation or Update Rule, if not activated the rule wont take effect.
How to Activate the rule?
  • Click the Activate button.
    Automatic Record Creation or Updation5


25 Jan 2016

Sample PlugIn to perform CRUD operation- Late Bound


Sample Program to illustrate CRUD operations using Late bond.

Entities:
Department- Parent entity
Employee- Child entity

Task: 
Update Employee count filed in Department entity when a create, update  and delete Employee entity.

Note: Here I used fetchXML to retrieve multiple records(used resource file)

FetchXML query:

 <fetch version="1.0" output-format="xml-platform" mapping="logical" distinct="false" aggregate="true">  
  <entity name="cit_employee">  
   <attribute name="cit_employeeid" aggregate="count" alias="empCount" />  
   <filter type="and">  
    <condition attribute="cit_department" operator="eq" value="{0}" />  
   </filter>  
  </entity>  
 </fetch>  

coding is

 using System;  
 using System.Collections.Generic;  
 using System.Linq;  
 using System.Text;  
 using System.Threading.Tasks;  
 using System.Runtime.Serialization;  
 using System.Globalization;  
 using System.ServiceModel;  
 using Microsoft.Xrm.Sdk;  
 using Microsoft.Xrm.Sdk.Query;  
 namespace EmployeeCountDepartmentWise  
 {  
   public class EmployeeCount : IPlugin  
   {  
     public void Execute(IServiceProvider _serviceProvider)  
     {  
       IPluginExecutionContext _context = (IPluginExecutionContext)_serviceProvider.GetService(typeof(IPluginExecutionContext));  
       IOrganizationServiceFactory _factory = (IOrganizationServiceFactory)_serviceProvider.GetService(typeof(IOrganizationServiceFactory));  
       IOrganizationService _service = _factory.CreateOrganizationService(_context.UserId);  
       if(_context.InputParameters.Contains("Target"))  
       {  
         if (_context.InputParameters["Target"] is Entity)  
         {  
           Entity _empEntity = (Entity)_context.InputParameters["Target"];  
           if (_empEntity.LogicalName.ToLower() == "cit_employee")  
           {  
             switch (_context.MessageName)  
             {    
               case "Create":  
                 try  
                 {  
                   Guid _deptId = ((EntityReference)_empEntity.Attributes["cit_department"]).Id;  
                   PostEventOperation(_service, _deptId);  
                 }  
                 catch (FaultException<OrganizationServiceFault> ex)  
                 {  
                   throw new InvalidPluginExecutionException("An error occurred in CFR13.DemoPlugin plug-in.", ex);  
                 }  
                 break;  
               case "Update":  
                 try  
                 {  
                   Guid _deptPreImageId = Guid.Empty; Guid _deptPostImageId = Guid.Empty;  
                   if (_context.PreEntityImages.Contains("PreImage"))  
                   {  
                     Entity _preEntityImage = (Entity)_context.PreEntityImages["PreImage"];  
                     if (_preEntityImage.Contains("cit_department"))  
                     {  
                       _deptPreImageId = ((EntityReference)_preEntityImage.Attributes["cit_department"]).Id;  
                     }  
                     if (_empEntity.Attributes.Contains("cit_department"))  
                     {  
                       _deptPostImageId = ((EntityReference)_empEntity.Attributes["cit_department"]).Id;  
                     }  
                     Guid[] ar = new Guid[] { _deptPreImageId, _deptPostImageId };  
                     int i = 0;  
                     while (i < 2)  
                     {  
                       PostEventOperation(_service, ar[i]);  
                       i++;  
                     }  
                   }  
                 }  
                 catch (FaultException<OrganizationServiceFault> ex)  
                 {  
                   throw new InvalidPluginExecutionException("An error occurred in CFR13.DemoPlugin plug-in.", ex);  
                 }  
                 break;  
             }  
           }  
         }  
         else if (_context.InputParameters["Target"] is EntityReference)  
         {  
           EntityReference _empEntity = (EntityReference)_context.InputParameters["Target"];  
           if (_empEntity.LogicalName.ToLower() == "cit_employee")  
           {  
             if (_context.MessageName == "Delete")  
             {  
               try  
               {  
                 if (_context.PreEntityImages.Contains("PreImage"))  
                 {  
                   Entity _preImage = (Entity)_context.PreEntityImages["PreImage"];  
                   if (_preImage.Contains("cit_department"))  
                   {  
                     Guid _deptId = ((EntityReference)_preImage.Attributes["cit_department"]).Id;  
                     PostEventOperation(_service, _deptId);  
                   }  
                 }  
               }  
               catch (FaultException<OrganizationServiceFault> ex)  
               {  
                 throw new InvalidPluginExecutionException("An error occurred in CFR13.DemoPlugin plug-in.", ex);  
               }  
             }  
           }  
         }  
       }  
     }  
     public void PostEventOperation(IOrganizationService _service, Guid depId)  
     {  
       Entity _deptEntity = new Entity("cit_department");  
       _deptEntity["cit_departmentid"] = depId;  
       string _getEmployeeCount = string.Format(CultureInfo.CurrentCulture, FetchXML.getEmployeeCount, depId);  
       EntityCollection _entityCollection = (EntityCollection)_service.RetrieveMultiple(new FetchExpression(_getEmployeeCount));  
       if (_entityCollection.Entities.Count == 1)  
       {  
         int val = (int)((AliasedValue)_entityCollection.Entities[0]["empCount"]).Value;  
         _deptEntity["cit_employeecount"] = Convert.ToString(val);  
         _service.Update(_deptEntity);  
       }  
     }  
   }  
 }  

Expecting Suggestions......

Why did Microsoft partner with Salesforce?

Expect the unExpected

When Microsoft teamed up with Salesforce last year it prompted shock and a few grumbles from the Microsoft Dynamics community.
Microsoft makes money selling non crm services and products
  • Windows
  • Microsoft Office
  • Azure
  • Cloud infrastructure
  • Other products
Microsoft Dynamics CRM resellers were frustrated because one of the key advantages Microsoft Dynamics CRM had over Salesforce was its integration with Microsoft products.
The CRM community questioned if the Salesforce partnership would lose Microsoft CRM deals to competing bids from Salesforce?
The first reaction is often an over reaction and Microsoft CRM resellers didn’t lose bids to their Salesforce counterparts en masse after the partnership (integration will take time from Salesforce).  I doubt the key reasons for choosing Microsoft Dynamics CRM as the technology to deliver a project wasn’t due to it’s integration with Microsoft Office.

Why do companies win bids?

What are the key ingredients to a winning bid?
  • People
  • connecting with the customer and understanding their problems and requirements
  • Vision
  • Experience
  • vertical or industry solutions
Competing bids using different technologies are usually close with different strengths and weaknesses.  The key differentiator is the company, people and how well they connect with the customer.
Consider the most common cause of failure of projects isn’t the technology used but the people and the working relationship.

Conclusion:

Instead of focusing on competing with Saleforces, Microsoft is focusing on improving the applications which can integrate with Microsoft Dynamics CRM and Azure services which can be consumed by CRM.


How to Calculate a work Timestamp based on a calendar

Enhanced Service Level Agreements (SLA’s) are one of the most helpful features that the latest version of Microsoft Dynamics CRM has to offer. This feature can calculate the amount of time spent on a specific case or even the amount of time a case was on hold.  However, SLAs cannot calculate the next work timestamp.
Consider the following scenario of escalating a critical case.
Challenge: You need to calculate the work timestamp that indicates when a critical case can be escalated based on a CSR’s calendar. If a critical case was created on Friday at 4:30pm and your CSR’s don’t work during the weekend, you need to add four hours to when the case is created and come up with a timestamp for when the case should be escalated. The timestamp should fall on a working day for a CSR. It could be on Monday or even Tuesday if it was a holiday weekend.

So how do you calculate a work timestamp based on a calendar in Microsoft Dynamics CRM 2015?

Solution:  We create a custom entity that takes a calendar GUID (string, as CRM does not allow lookups to Calendar entity – CSR calendar), start time (DateTime – case createdon/modifiedon), hours, minutes, and seconds as integers for the amount of time to add to the start time. On the creation of this entity, a plugin is triggered that does the calculation and stores the result in the same record in the work timestamp field. Employing a custom entity gives the benefit of calling create from JavaScript, custom code or even from inside any other plugin.
The following are screenshots of how the entity looks before and after.
Timestamp-Blog-Photo-1 Timestamp-Blog-Photo-2
Above you can see that based on a provided start time, the CSR calendar, and amount of time; the plugin calculates the work timestamp.
 I have bundled this in an unmanaged CRM 2015 solution that you can import. Also available is a complete plugin code in case you would like to use the code separately.

22 Jan 2016

Save Time Entering Data into CRM by Mapping Fields between Records

It’s been said that a database is only as good at the data in it. A good way to insure good data is to reduce the amount of data entry by your users and to insure the correct data is entered. A way to accomplish this is through the mapping of fields from parent records to related, child records.

The key to making the mapping work is that the users need to create the new, child record from the parent record. For example, if you have an Opportunity record open, you would then select Quote from the left navigation and then click the ‘Add New Quote’ button from the ribbon when it changes.
To setup the mapping, do the following:
  1. Get to ‘Customizations’.  One way to do this is to go to ‘Settings’, ‘Customizations’, and then choose ‘Customize the System’.


  2. Select arrow to the left of the parent entity to expose the sub-menu items. In our example, that is the Opportunity.


  3. Once there, go to the Opportunity entity and click on the ‘1:N Relationships’.


  4. Next click on ‘Mappings’ and then the ‘New’ button.


  5. Lastly, choose the source and target fields, click ‘OK’ and you’re done.


  • An important note here is that the field types must be same on both entities if you want to map fields
  • The AttributeMetadata type must match.
  • The length of the target field cannot be shorter than the source field.
  • The format must match.
  • The target field must not be used in another mapping.
  • The will work if only you create child record from parent record, through subgrid or an associated view.
  • The target field must be a field in which a user can enter data.
  • Address ID values cannot be mapped.
  • It wont inherit the fields mapping define before(possible with Plugin)